Vue CLI 教程
前言 如果你不想看这里,那么可以直接跳到后面去。
在官网开了Vue.js 和Vue CLI 的官方文档,也只介绍了在普通html项目怎么使用,现在我自己整理了下,各个模块在基于webpack的Vue项目中的使用。相关介绍也可以去官网查看,本文仅介绍使用方法,因为也是新手小白,有错误的地方还请多多指正。本问有些地方引用了菜鸟教程的在线编辑器,在这里感谢菜鸟教程做出的贡献。
安装
Node 版本要求
Vue CLI 需要 Node.js 8.9 或更高版本 (推荐 8.11.0+)。你可以使用 nvm 或 nvm-windows 在同一台电脑中管理多个 Node 版本。
关于旧版本
Vue CLI 的包名称由 vue-cli 改成了 @vue/cli。 如果你已经全局安装了旧版本的 vue-cli(1.x 或 2.x),你需要先通过 npm uninstall vue-cli -g 或 yarn global remove vue-cli 卸载它。
安装好Node.js后就可以开始Vue的起步了。
因为要连接国外的资源,所以会下载的手会很慢。请保持网速。
淘宝镜像
解决这个情况可以使用淘宝的镜像以及命令cnpm,但是有时候会出问题,安装时保证npm版本大于3.0
查看npm版本:
升级npm:
安装cnpm:
1 $ npm install -g cnpm --registry=https://registry.npm.taobao.org
安装完成后就可以用cnpm代替npm了。一下教程使用的还是npm。
开始
首先使用命令安装vue:
查看是否安装成功,本命令为查看版本:
安装全局Vue CLI
1 $ npm install --global vue-cli
创建一个vue项目,vueweb为项目名称,你也可以在安装的时候更改,注意项目名称里面不要有大写字母,也不要使用中文。
1 $ vue init webpack vueweb
注意,这里会有一些配置,我来解释一下(#后面为我的注释,不要输入进去):
1
2
3
4
5
6
7
8
9
10
11
12
13
14
15
16
17
18
19
20
? Project name (vueweb) # 项目名称,括号中为默认名称,回车即可 ? Project description (A Vue.js project) # 项目描述信息,回车即可 ? Author 1419908068 <1419908068@qq.com> # 项目作者,默认即可 ? Vue build standalone # 好像是打包的时候用的,回车即可 ? Install vue-router?(Y/N)Y # 是否安装vue-router,建议:Y ? Use ESLint to lint your code? (Y/N) # 是否使用ESLint验证,建议:N,否则后面因为格式会出很多问题。 ? Set up unit tests(Y/N) Yes # 是否安装单元测试,没什么用,建议:N ? Setup e2e tests with Nightwatch(Y/n)? #是否安装E2E测试框架NightWatch,建议:N # 项目创建后是否要为你运行“npm install”?这里选择包管理工具 # 选项有三个(上下箭头选择,回车即为选定)建议 : yes use npm Should we run 'npm install' for you after the project has been created? # 使用npm yes,use npm # 使用yarn yes,use yarn # 自己操作 no,I will handle that myself
安装完成后就可以开发了,当然任何开发都少不了开发工具,这里推荐使用HBuilder ,占用体积小,功能强大。当然也可以使用微软的Visual Studio ,但是这个占用内存太大了。本教程使用的是HBuilder X 2.4.4.
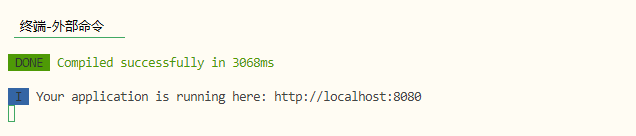
测试是否安装成功
打开HBuilder然后倒入项目vueweb,右键项目选择外部命令/插件,再点击npm run dev
如果报一下错误:
1
2
3
4
5
6
7
8
9
10
11
12
13
14
15
16
> vueweb@1.0.0 dev D:\文件\JavaWebx项目\vueTest\vueweb > webpack-dev-server --inline --progress --config build/webpack.dev.conf.js 'webpack-dev-server' 不是内部或外部命令,也不是可运行的程序 或批处理文件。 npm ERR! code ELIFECYCLE npm ERR! errno 1 npm ERR! vueweb@1.0.0 dev: `webpack-dev-server --inline --progress --config build/webpack.dev.conf.js` npm ERR! Exit status 1 npm ERR! npm ERR! Failed at the vueweb@1.0.0 dev script. npm ERR! This is probably not a problem with npm. There is likely additional logging output above. npm ERR! A complete log of this run can be found in: npm ERR! C:\Users\Administrator\AppData\Roaming\npm-cache\_logs\2019-12-10T13_06_55_461Z-debug.log
不要慌运行npm install,等待安装完毕之后,在点击npm run dev
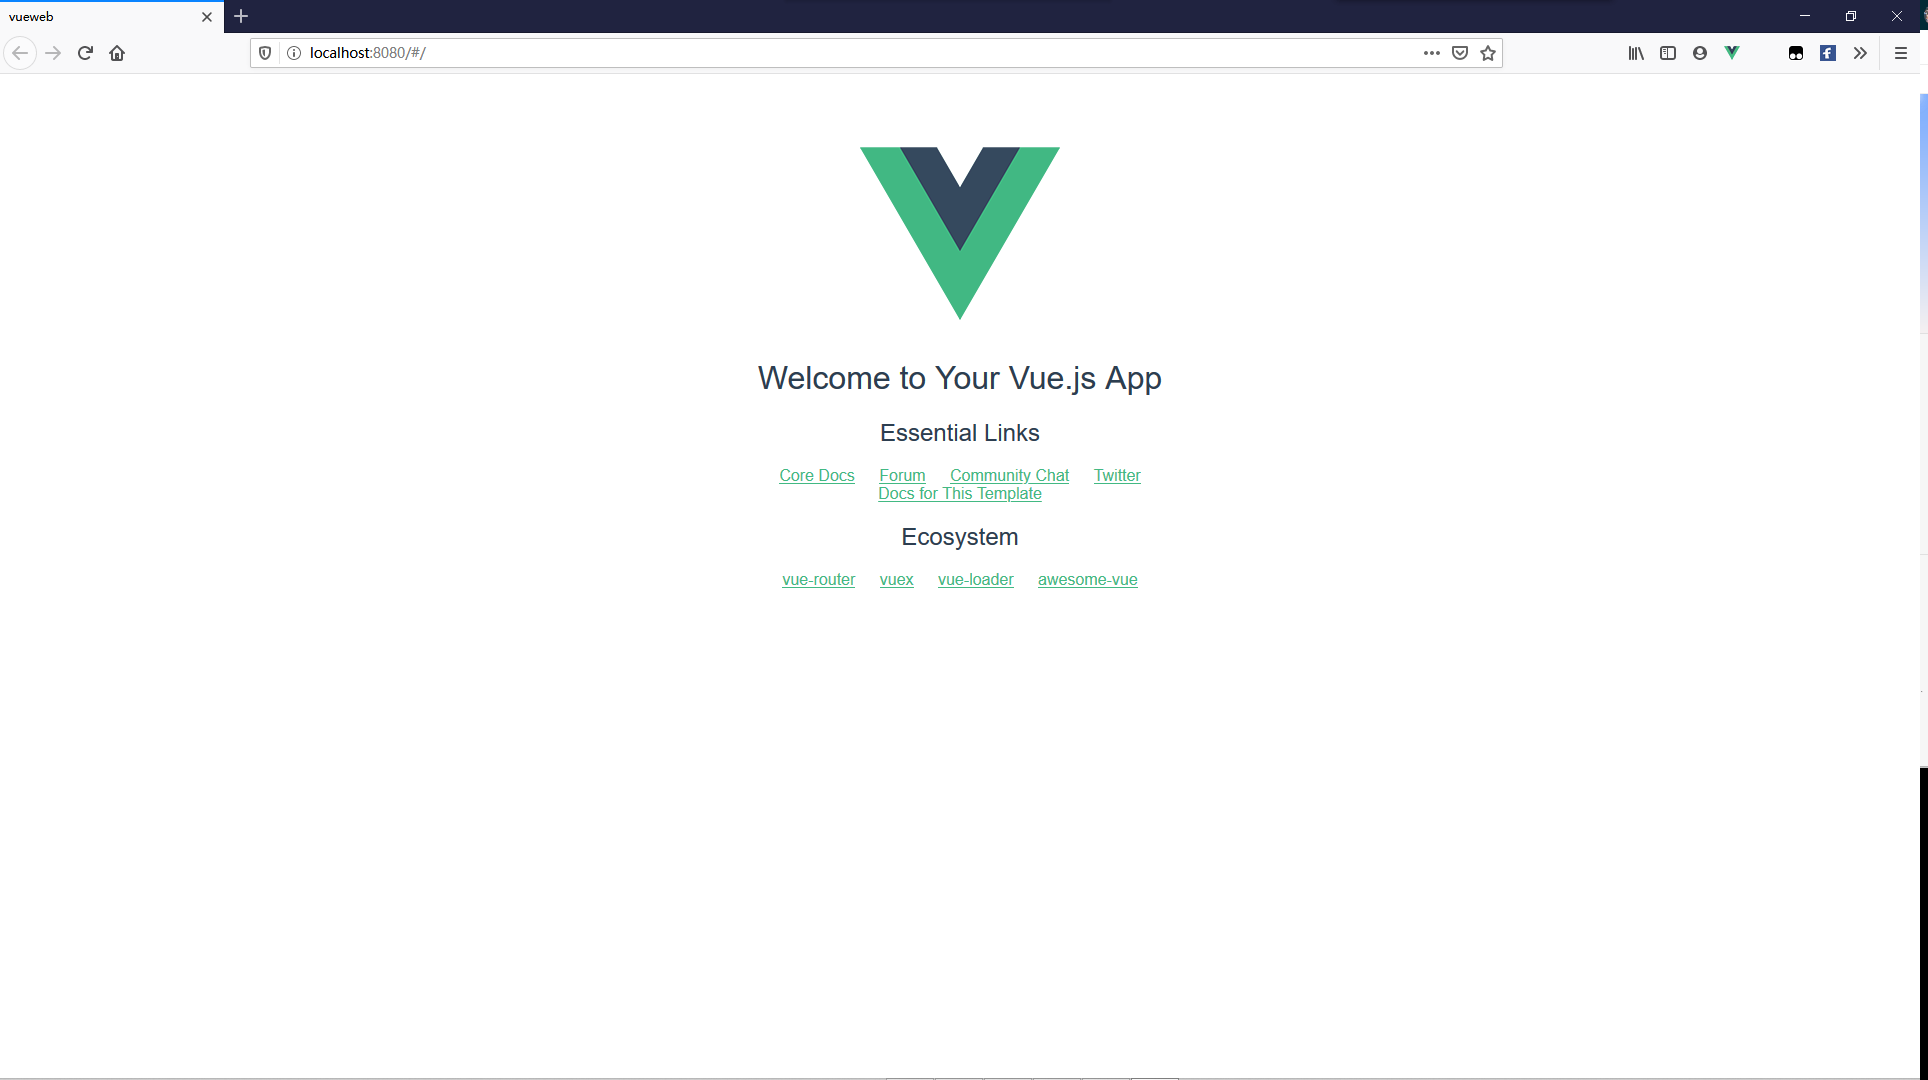
在浏览器输入http://localhost:8080
显示该页面即可。
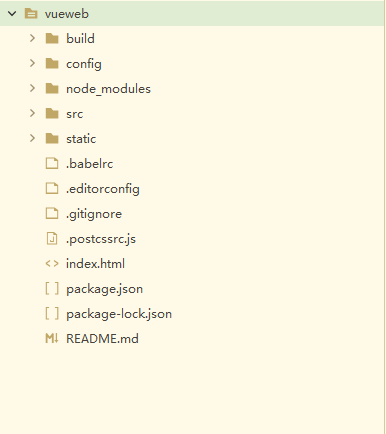
目录结构
目录/文件
说明
build
项目构建(webpack)相关代码
config
配置目录,包括端口号等。我们初学可以使用默认的。
node_modules
npm 加载的项目依赖模块
src
这里是我们要开发的目录,基本上要做的事情都在这个目录里。里面包含了几个目录及文件:assets: 放置一些图片,如logo等。components: 目录里面放了一个组件文件,可以不用。App.vue: 项目入口文件,我们也可以直接将组件写这里,而不使用 components 目录。main.js: 项目的核心文件。
static
静态资源目录,如图片、字体等。
test
初始测试目录,可删除
.xxxx文件
这些是一些配置文件,包括语法配置,git配置等。
index.html
首页入口文件,你可以添加一些 meta 信息或统计代码啥的。
package.json
项目配置文件。
README.md
项目的说明文档,markdown 格式
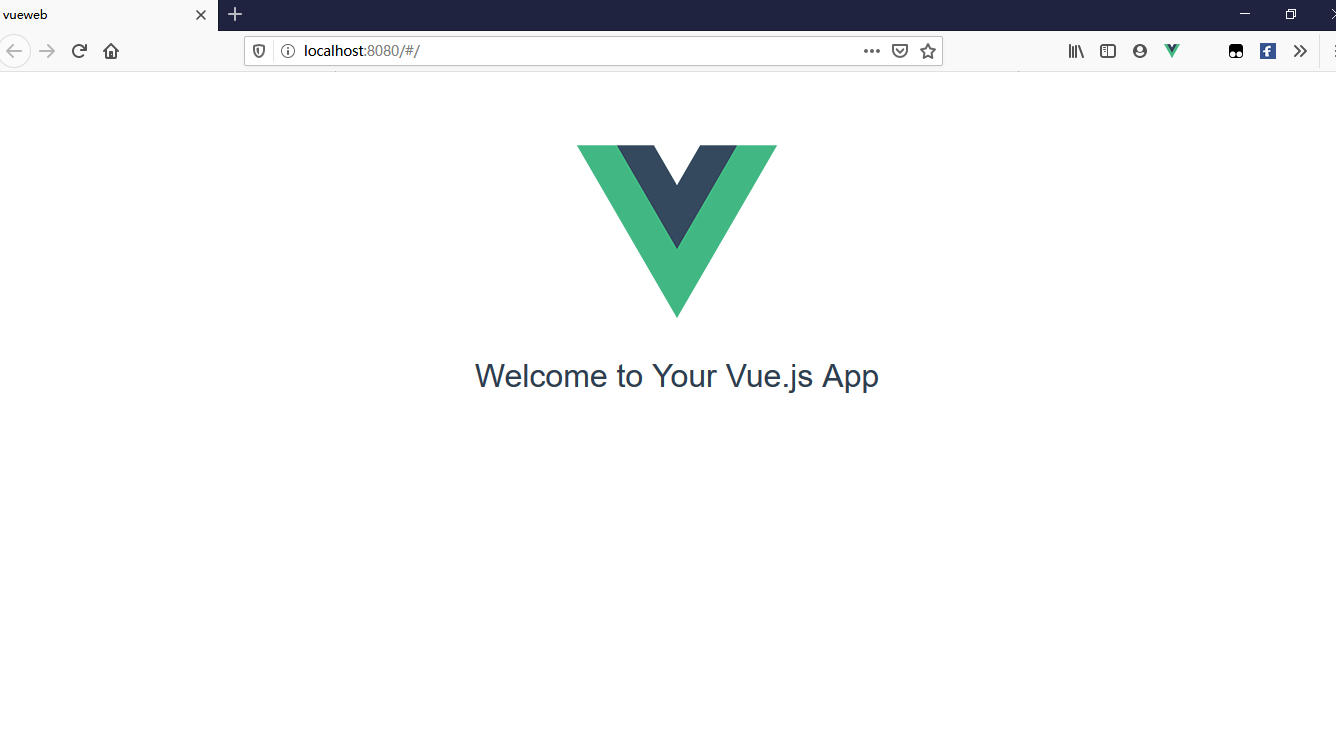
现在我们来修改一些配置:
在src/router/index.js中的export default new Router({后面添加mode:‘history’,这样可以让路径上的#去掉。
找到src/components/HelloWorld.vue,我们在学习路由(router)之前就以HelloWorld.vue页面为模板进行开发
这个时候浏览器页面会显示为这样,不用管他:
起步 使用之前有一些注意事项需要说明一下:
所有页面文件后缀必须为.vue,后面会讲到怎么使用
Vue文件中基本要有的三个标签:template、script、style`
1 2 3 4 5 6 7 8 9 10 11 12 13 14 15 16 17 <template > <div class ="hello" > </div > </template > <script > export default { name: 'name' , data() { } } </script > <style scoped > </style >
编写时请严格按照语法编写
Vue模板语法 Vue.js 使用了基于 HTML 的模板语法,允许开发者声明式地将 DOM 绑定至底层 Vue 实例的数据。所有 Vue.js 的模板都是合法的 HTML ,所以能被遵循规范的浏览器和 HTML 解析器解析。
插值
文本
数据绑定最常见的方式就是用双大括号来显示,代码中
1 2 3 4 5 6 7 8 9 10 11 12 13 14 15 16 <template > <div class ="hello" > <h1 > {{ msg }}</h1 > </div > </template > <script > export default { name: 'HelloWorld' , data () { return { msg: 'Welcome to Your Vue.js App' } } } </script >
尝试一下
原始HTML
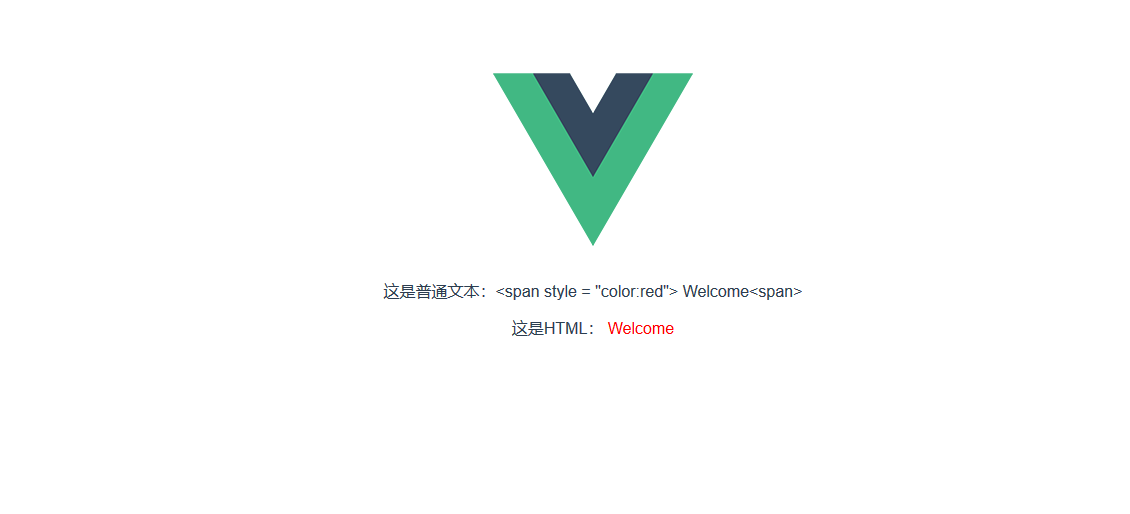
双大括号仅仅显示的是普通文本,如果想输出正在的HTML,那么需要使用v-html指令:
1 2 3 4 5 6 7 8 9 10 11 12 13 14 15 16 17 <template > <div class ="hello" > <p > 这是普通文本:{{ msg }}</p > <p > 这是HTML:<span v-html ="msg" > </span > </p > </div > </template > <script > export default { name: 'HelloWorld' , data() { return { msg: '<span style = "color:red" > Welcome<span > ' } } } </script >
尝试一下
属性
HTML属性的值应使用v-bind指令来改变。
1 2 3 4 5 6 7 8 9 10 11 12 13 14 15 16 17 18 19 20 21 22 23 24 25 26 27 <template > <div class ="hello" > <label for ="r1" > 修改背景颜色</label > <input type ="checkbox" v-model ="use" id ="r1" > <label for ="r2" > 隐藏</label > <input type ="checkbox" v-model ="hidd" id ="r2" > <p v-bind:class ="{'class1': use}" v-bind:hidden ="hidd" > <span v-html ="msg" > </span > </p > </div > </template > <script > export default { name: 'HelloWorld' , data() { return { msg: '<span style = "color:red" > Welcome<span > ', use : false , hidd: false } } } </script > <style scoped > .class1 { background-color : #B5D592 ; } </style >
尝试一下
以下实例判断 class1 的值,如果为user为 true 使用 class1 类的样式,否则不使用,hidd为true则使用hidden属性,否则不使用。
JavaScript表达式
Vue中提供了完全的JavaScript表达式的支持。
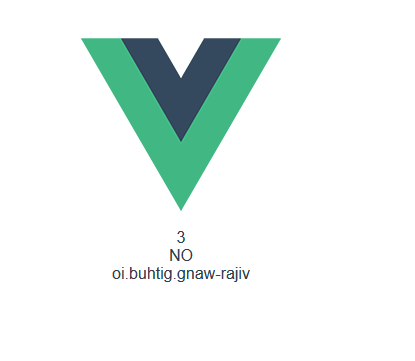
1 2 3 4 5 6 7 8 9 10 11 12 13 14 15 16 17 18 19 20 21 22 23 24 25 26 <template > <div class ="hello" > {{ number + 1 }}<br /> {{ ok ? 'YES' : 'NO' }}<br /> {{ message.split('').reverse().join('') }}<br /> </div > </template > <script > export default { name: 'HelloWorld' , data() { return { message: 'vijar-wang.github.io' , ok: false , number : 2 } } } </script > <style scoped > </style >
尝试一下
过滤器
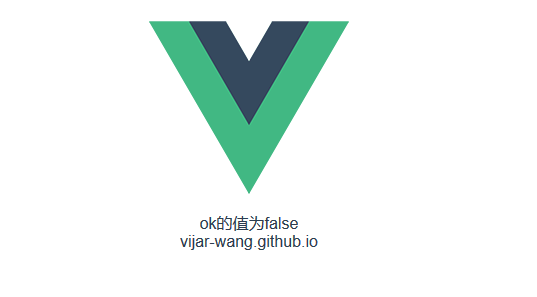
Vue.js 允许你自定义过滤器,被用作一些常见的文本格式化。由”|”指示,使用过滤器完成和上面一样的想过:
1 2 3 4 5 6 7 8 9 10 11 12 13 14 15 16 17 18 19 20 21 22 23 24 25 26 27 28 29 30 31 32 33 34 35 36 37 <template > <div class ="hello" > {{ ok | filter1 }}<br /> {{ message }}<br /> </div > </template > <script > export default { name: 'HelloWorld' , data() { return { message: 'vijar-wang.github.io' , ok: false } },filters:{ filter1:function (value) if(value){ value = 'ok的值为true' }else { value = 'ok的值为false' } return value }, filter2:function (value) value = value.split('' ).reverse().join('' ) return value; } } } </script > <style scoped > </style >
尝试一下
Vue条件语句 Vue提供v-if指令来判断元素是否渲染,同时还有v-else表示else,v-else-if表示if else,但是注意else必须紧跟在v-if下面,否则不会渲染。
1 2 3 4 5 6 7 8 9 10 11 12 13 14 15 16 17 18 19 20 21 22 <template > <div class ="hello" > <h1 v-if ="ok" > Yes</h1 > <h2 v-else-if ="!ok" > No</h2 > <h2 v-else > {{ok}}</h2 > </div > </template > <script > export default { name: 'HelloWorld' , data() { return { ok: true } } } </script > <style scoped > </style >
尝试一下
还有v-show来判断是否渲染
1 <h1 v-show ="ok" > Hello!</h1 >
Vue循环语句 Vue的循环使用v-for指令,v-for指令需要以site in sites的形式的语法,sites是数组,site是迭代元素的别名。使用命令时加载需要遍历的标签上即可。
1 2 3 4 5 6 7 8 9 10 11 12 13 14 15 16 17 18 19 20 21 22 23 <template > <ul > <li v-for ="(week,index) in weeks" > {{index}}:{{week}}</li > </ul > </template > <script > export default { name: 'HelloWorld' , data() { return { weeks: ['Monday' , "Tuesday" , "Wednesday" , 'Thursdat' , 'Friday' , 'Staurday' , 'Sunday' ] } } } </script > <style scoped > ul li { list-style: none; } </style >
尝试一下
渲染结果:
0:Monday 1:Tuesday 2:Wednesday 3:Thursdat 4:Friday 5:Staurday 6:Sunday
# Vue计算属性
关键词computed,在处理一些复杂逻辑时是很有用的,
1 2 3 4 5 6 7 8 9 10 11 12 13 14 15 16 17 18 19 20 21 22 23 24 25 26 <template > <div > <p > 原始字符串: {{ message }}</p > <p > 计算后反转字符串: {{ reversedMessage }}</p > </div > </template > <script > export default { name: 'HelloWorld' , data() { return { message: 'vijar-wang.github.io' } }, computed: { reversedMessage: function () return this .message.split('' ).reverse().join('' ) } } } </script > <style scoped > </style >
尝试一下
渲染结果
原始字符串: vijar-wang.github.io
计算后反转字符串: oi.buhtig.gnaw-rajiv
# Vue监听属性
可以通过 watch 来响应数据的变化
1 2 3 4 5 6 7 8 9 10 11 12 13 14 15 16 17 18 19 20 21 22 23 24 25 26 27 28 29 30 31 32 <template > <div > 千米 : <input type ="text" v-model ="kilometers" > 米 : <input type ="text" v-model ="meters" > </div > </template > <script > export default { name: 'HelloWorld' , data() { return { kilometers: 0, meters: 0 } }, watch: { kilometers: function (val) this .kilometers = val; this .meters = this .kilometers * 1000 }, meters: function (val) this .kilometers = val / 1000 ; this .meters = val; } } } </script > <style scoped > </style >
尝试一下
Vue事件处理 可以用 v-on 指令监听 DOM 事件,并在触发时运行一些 JavaScript 代码。
点击事件
1 2 3 4 5 6 7 8 9 10 11 12 13 14 15 16 17 18 19 20 <template > <div > <button v-on:click ="kilometers++" > 点击第{{kilometers}}次</button > </div > </template > <script > export default { name: 'HelloWorld' , data() { return { kilometers: 0 } } } </script > <style scoped > </style >
点击第0 次
[尝试一下](https://www.runoob.com/try/try.php?filename=vue2-v-on3)
除了点击事件,还有其他事件修饰
1
2
3
4
5
6
7
8
9
10
11
12
13
14
15
16
17
18
19
20
21
22
<!-- 阻止单击事件继续传播 --> <a v-on:click.stop="doThis"></a> <!-- 提交事件不再重载页面 --> <form v-on:submit.prevent="onSubmit"></form> <!-- 修饰符可以串联 --> <a v-on:click.stop.prevent="doThat"></a> <!-- 只有修饰符 --> <form v-on:submit.prevent></form> <!-- 添加事件监听器时使用事件捕获模式 --> <!-- 即元素自身触发的事件先在此处理,然后才交由内部元素进行处理 --> <div v-on:click.capture="doThis">...</div> <!-- 只当在 event.target 是当前元素自身时触发处理函数 --> <!-- 即事件不是从内部元素触发的 --> <div v-on:click.self="doThat">...</div> <!-- 点击事件将只会触发一次 --> <a v-on:click.once="doThis"></a>
按键处理
1 2 <input v-on:keyup.13 ="submit" >
各按键的值如下:
keyCode
实际键值
48到57
0到9
65到90
a到z(A到Z)
112到135
F1到F24
8
BackSpace(退格)
9
Tab
13
Enter(回车)
20
Caps_Lock(大写锁定)
32
Space(空格键)
37
Left(左箭头)
38
Up(上箭头)
39
Right(右箭头)
40
Down(下箭头)
但是记住每个keyCode时很不容易的,Vue 为最常用的按键提供了别名,使用方法:
1 2 3 4 5 6 7 8 9 10 11 12 13 14 15 16 17 18 19 20 21 22 23 24 25 26 27 28 29 30 31 <template > <div > 测试enter:<input v-on:keyup.enter ="enterKey()" /> <br /> 测试spaceKey:<input v-on:keyup.space ="spaceKey()" /> <br /> 测试escKey:<input v-on:keyup.esc ="escKey()" /> <br /> 测试delete:<input v-on:keyup.delete ="deleteKey()" /> <br /> </div > </template > <script > export default { name: 'HelloWorld' , data() { return { kilometers: 0, meters: 0 } }, methods:{ enterKey(){ alert("你按下了enter键" )}, spaceKey(){ alert("你按下了space键" )}, escKey(){ alert("你按下了esc键" )}, deleteKey(){ alert("你按下了delete键" )} } } </script > <style scoped > </style >
全部的按键别名:
.enter.tab.delete (捕获“删除”和“退格”键).esc.space.up.down.left.right
可以通过全局 config.keyCodes 对象自定义按键修饰符别名 :
1 // 可以使用 `v-on:keyup.f1`Vue.config.keyCodes.f1 = 112
向上面的按键监听可以改为动态的监听
1 2 3 4 5 6 7 8 9 10 11 12 13 14 15 16 17 18 19 20 21 22 23 24 25 26 27 28 29 30 <template > <div > </div > </template > <script > export default { name: 'HelloWorld' , data() { return { kilometers: 0, meters: 0 } }, created() { document .onkeydown = function (e ) var key = window .event.keyCode; if(key == 13){ alert("按下了enter" ); }else if (key == 32 ){ alert("按下了Space" ); } } } } </script > <style scoped > </style >
这样在点击enter和space的时候就会弹出提示框。
鼠标监听
这些修饰符会限制处理函数仅响应特定的鼠标按钮。
Vue表单绑定 你可以用 v-model 指令在表单 、 及 `` 元素上创建双向数据绑定。
1 2 3 4 5 6 7 8 9 10 11 12 13 14 15 16 17 18 19 <template > <div > <input v-model ="name" /> </div > </template > <script > export default { name: 'HelloWorld' , data() { return { name: "小明" } } } </script > <style scoped > </style >
当data中name的值发生改变,表单中的值也会发生改变。
尝试一下
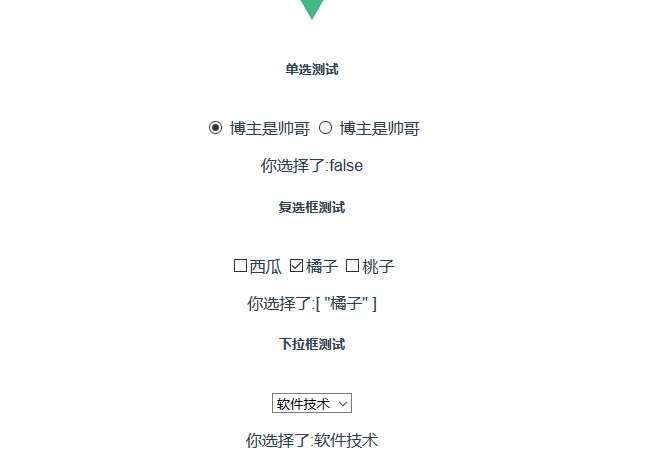
不仅仅是输入框,复选框,单选框、select也可以双向绑定。
1 2 3 4 5 6 7 8 9 10 11 12 13 14 15 16 17 18 19 20 21 22 23 24 25 26 27 28 29 30 31 32 33 34 35 36 37 38 <template > <div > <h5 > 单选测试</h5 > <br /> <input v-model ="redio" value ="false" id ="false" type ="radio" name ="tadiotest" /> <label for ="false" > 博主是帅哥</label > <input v-model ="redio" value ="true" id ="true" type ="radio" name ="tadiotest" /> <label for ="true" > 博主是帅哥</label > <p > 你选择了:{{redio}}</p > <h5 > 复选框测试</h5 > <br /> <input type ="checkbox" id ="xigua" value ="西瓜" v-model ="check" /> <label for ="yes" > 西瓜</label > <input type ="checkbox" id ="juzi" value ="橘子" v-model ="check" /> <label for ="juzi" > 橘子</label > <input type ="checkbox" id ="taozi" value ="桃子" v-model ="check" /> <label for ="taozi" > 桃子</label > <p > 你选择了:{{check}}</p > <h5 > 下拉框测试</h5 > <br /> <select v-model ="selected" name ="fruit" > <option value ="" > 选择一个</option > <option value ="软件技术" > 软件技术</option > <option value ="网络技术" > 网络技术</option > </select > <p > 你选择了:{{selected}}</p > </div > </template > <script > export default { name: 'HelloWorld' , data() { return { redio:"false" , check:[], selected:"" } } } </script > <style scoped > </style >
修饰符
.lazy
在默认情况下,v-model 在每次 input 事件触发后将输入框的值与数据进行同步 (除了上述 输入法组合文字时)。你可以添加 lazy 修饰符,从而转变为使用 change事件进行同步:
1 <!-- 在“change”时而非“input”时更新 --><input v-model.lazy="msg" >
.number
如果想自动将用户的输入值转为数值类型,可以给 v-model 添加 number 修饰符:
1 <input v-model.number="age" type="number">
这通常很有用,因为即使在 type="number" 时,HTML 输入元素的值也总会返回字符串。如果这个值无法被 parseFloat() 解析,则会返回原始的值。
.trim
如果要自动过滤用户输入的首尾空白字符,可以给 v-model 添加 trim 修饰符:
1 <input v-model.trim="msg">
Vue组件 组件是可复用的 Vue 实例,且带有一个名字:在这个例子中是 ``。我们可以在一个通过 new Vue 创建的 Vue 根实例中,把这个组件作为自定义元素来使用。
定义全局组件
在main.js文件中加入以下代码,然后再想要使用的页面直接调用标签就好,com1为全局组件。
1
2
3
4
var com = { template: '<h1>这是一个全局自定义的组件</h1>' } Vue.component("com1",com)
定义局部组件
1 2 3 4 5 6 7 8 9 10 11 12 13 14 15 16 17 18 19 20 21 22 23 24 25 <template > <div > <com > </com > </div > </template > <script > var com = { template: '<h1 > 这是一个自定义的组件</h1 > ' } export default { name: 'HelloWorld' , data() { return { } }, components:{ 'com' :com } } </script > <style scoped > </style >
本例中的com就是局部组件,只能在这一个页面中使用。
如果自定义的组件是一个页面,那么使用import导入,例如你创建一个tmp.vue的文件作为模板,你可以这样使用它:
1
2
import Tmp from '@/commponents/tmp' Vue.component("Tmp" ,Tmp)
如果是要在全局引入,可以把上面代码写到main.js文件中去。
1 HTML 中的特性名是大小写不敏感的,所以浏览器会把所有大写字符解释为小写字符。这意味着当你使用 DOM 中的模板时,camelCase (驼峰命名法) 的 prop 名需要使用其等价的 kebab-case (短横线分隔命名) 命名
Prop prop 是父组件用来传递数据的一个自定义属性。
父组件的数据需要通过 props 把数据传给子组件,子组件需要显式地用 props 选项声明 “prop”
1 2 3 4 5 6 7 8 9 10 11 12 13 14 15 16 17 18 19 20 21 <template > <div > <com message ="message属性" > </com > </div > </template > <script > var com = { props:["message" ], template: '<h1 > {{message}} </h1 > ' } export default { name: 'HelloWorld' , components:{ 'com' :com } } </script > <style scoped > </style >
前面静态绑定Prop,动态绑定可以通过v-bind指令来绑定:
1 2 3 4 5 6 7 8 9 10 11 12 13 14 15 16 17 18 19 20 21 22 23 24 25 26 27 <template > <div > <input v-model ="msg" /> <br /> <com v-bind:message ="msg" > </com > </div > </template > <script > var com = { props: ["message" ], template: '<h1 > {{message}} </h1 > ' } export default { name: 'HelloWorld' , data() { return { msg: "动态绑定内容" } }, components: { 'com' : com } } </script > <style scoped > </style >
这里只要改变表单中的内容,自定义组件中的内容也会改变
Vue自定义事件、指令 前面讲了父组件向子组件传值,那么从子组件向父组件传值就需要用到自定义事件了
自定义事件 只配合一个事件名使用 $emit:
1 2 3 4 5 6 7 8 9 10 11 12 13 14 15 16 17 18 19 20 21 22 23 24 25 <template > <div > <my-button v-on:welcome ="coInfo" > </my-button > </div > </template > <script > var butt = { template: '<button v-on:click ="$emit(\'welcome\')" > 点击我</button > ' } export default { name: 'HelloWorld' , methods:{ coInfo(){ console .log("123" ); } }, components: { 'my-button' : butt } } </script > <style scoped > </style >
上面实例是一个简单的自定义事件,使用了Vue的$emit
创建一个普通的按钮自定义组件,给他一个自定义事件welcome然后在使用该组件的时候通过点击点击coInfo方法。
配合额外的参数使用 $emit:
1 2 3 4 5 6 7 8 9 10 11 12 13 14 15 16 17 18 19 20 21 22 23 24 25 26 27 28 29 30 31 32 33 34 35 36 <template > <div > <my-button v-on:welcome ="coInfo" > </my-button > </div > </template > <script > var butt = { template: '<button v-on:click ="addValue" > 点击我</button > ', data(){ return { num : 0 } }, methods:{ addValue(){ this .num = this .num +1 ; this .$emit("welcome" ,this .num); } } } export default { name: 'HelloWorld' , methods:{ coInfo(num){ console .log(num); } }, components: { 'my-button' : butt } } </script > <style scoped > </style >
在这里发现和上面不同的是$emit中多了个参数。现在解释一下全部代码。butt还是一个自定义组件,但是这个组件中包含了data参数(注意data格式)num,以及方法addValue。当点击自定义组件按钮时,num就会+1输出到控制台上。
自定义指令 除了默认的指令(v-model和v-bind),Vue也允许用户自定义指令。
举个聚焦输入框的例子:
1 2 3 4 5 6 7 8 9 10 11 12 13 14 15 16 17 18 19 20 21 22 23 24 <template > <div > <input v-focus /> </div > </template > <script > export default { name: 'HelloWorld' , methods:{ },directives:{ focus:{ inserted:function (el) el.focus() el.placeholder = "获取到焦点" } } } } </script > <style scoped > </style >
## 钩子
钩子函数
一个指令定义对象可以提供如下几个钩子函数 (均为可选):
bind:只调用一次,指令第一次绑定到元素时调用。在这里可以进行一次性的初始化设置。
inserted:被绑定元素插入父节点时调用 (仅保证父节点存在,但不一定已被插入文档中)。
update:所在组件的 VNode 更新时调用,但是可能发生在其子 VNode 更新之前 。指令的值可能发生了改变,也可能没有。但是你可以通过比较更新前后的值来忽略不必要的模板更新 (详细的钩子函数参数见下)。
componentUpdated:指令所在组件的 VNode 及其子 VNode 全部更新后调用。
unbind:只调用一次,指令与元素解绑时调用。
钩子函数参数
指令钩子函数会被传入以下参数:
el:指令所绑定的元素,可以用来直接操作 DOM 。
binding:一个对象,包含以下属性:
name:指令名,不包括 v- 前缀。
value:指令的绑定值,例如:v-my-directive="1 + 1" 中,绑定值为 2。
oldValue:指令绑定的前一个值,仅在 update 和 componentUpdated 钩子中可用。无论值是否改变都可用。
expression:字符串形式的指令表达式。例如 v-my-directive="1 + 1" 中,表达式为 "1 + 1"。
arg:传给指令的参数,可选。例如 v-my-directive:foo 中,参数为 "foo"。
modifiers:一个包含修饰符的对象。例如:v-my-directive.foo.bar 中,修饰符对象为 { foo: true, bar: true }。
vnode:Vue 编译生成的虚拟节点。移步 VNode API 来了解更多详情。
oldVnode:上一个虚拟节点,仅在 update 和 componentUpdated 钩子中可用。
钩子函数即为directives组件的函数,函数参数及为function()括号中的参数。
Vue路由 官方路由
对于路由官方文档讲的非常详细。这里简单示范一下路由的基本用发,如果需要用查看更多的内容请去文档,vue-router 文档
Vue项目中使用
Vue项目因为是用webpack模板,所以src目录下会自带一个router目录,其中index.js及为路由的配置文件
默认index.js内容为:
1
2
3
4
5
6
7
8
9
10
11
12
13
14
15
import Vue from 'vue' import Router from 'vue-router' import HelloWorld from '@/components/HelloWorld' Vue.use(Router) export default new Router({ routes: [ { path: '/' , name: 'HelloWorld' , component: HelloWorld } ] })
在main.js中有一行import router from './router',即为导入路由配置文件。
这里以一个登录项目为例、
首先在src/cpmponents目录下模仿HelloWorld新建两个vue文件。
Login.vue
1 2 3 4 5 6 7 8 9 10 11 12 13 14 15 16 17 18 19 20 21 22 23 24 25 26 27 28 29 30 31 32 33 34 35 36 37 38 39 40 41 42 <template > <div > <form name ="form1" > <label for ="username" > 用户名</label > <input id ="username" v-model ="username" name ="username" /> <br /> <label for ="password" > 密码</label > <input id ="password" v-model ="password" name ="password" /> </form > <button @click ="login()" > 登录</button > <p style ="color: red;" id ="msg" > {{msg}}</p > </div > </template > <script > export default { name: "login" , data(){ return { username:'' , password:'' , msg:"" } }, methods:{ login(){ if (this .username == "xiaoming" && this .password == "123" ){ this .$router.push({ path:"/index" , query:{ username:this .username } }) }else { this .msg = "用户名或密码错误!" } } } } </script > <style > </style >
Index.vue
1 2 3 4 5 6 7 8 9 10 11 12 13 14 15 16 17 18 19 20 21 22 23 <template > <div > <h1 v-if ="username!=''" > 欢迎您!{{username}}</h1 > <h1 v-else > 您未登录!</h1 > </div > </template > <script > export default { namme:"index" , data(){ return { username :"" } }, created() { this .username = this .$route.query.username; } } </script > <style > </style >
配置路由index.js文件:
1
2
3
4
5
6
7
8
9
10
11
12
13
14
15
16
17
18
19
20
21
22
23
24
25
26
27
28
29
30
31
32
33
34
35
import Vue from 'vue' import Router from 'vue-router' import HelloWorld from '@/components/HelloWorld' import Login from '@/components/Login' import Index from '@/components/Index' Vue.use(Router) export default new Router({ routes: [{ path: '/' , name: 'HelloWorld' , component: HelloWorld, meta:{ title:"HelloWorld" } }, { path: '/login' , name: 'login' , component: Login, meta:{ title:"登录" } }, { path: '/index' , name: 'index' , component: Index, meta:{ title:"首页" } } ] })
默认模式,在main.js中加入:
1 2 3 4 5 6 router.beforeEach((to, from , next ) => { if (to.meta.title){ document .title = to.meta.title next() } })
history模式在main.js中加入:
1
2
3
if (router.history.current.meta.title){ document .title = router.history.current.meta.title; }
这样配置在默认路由下可以显示title。
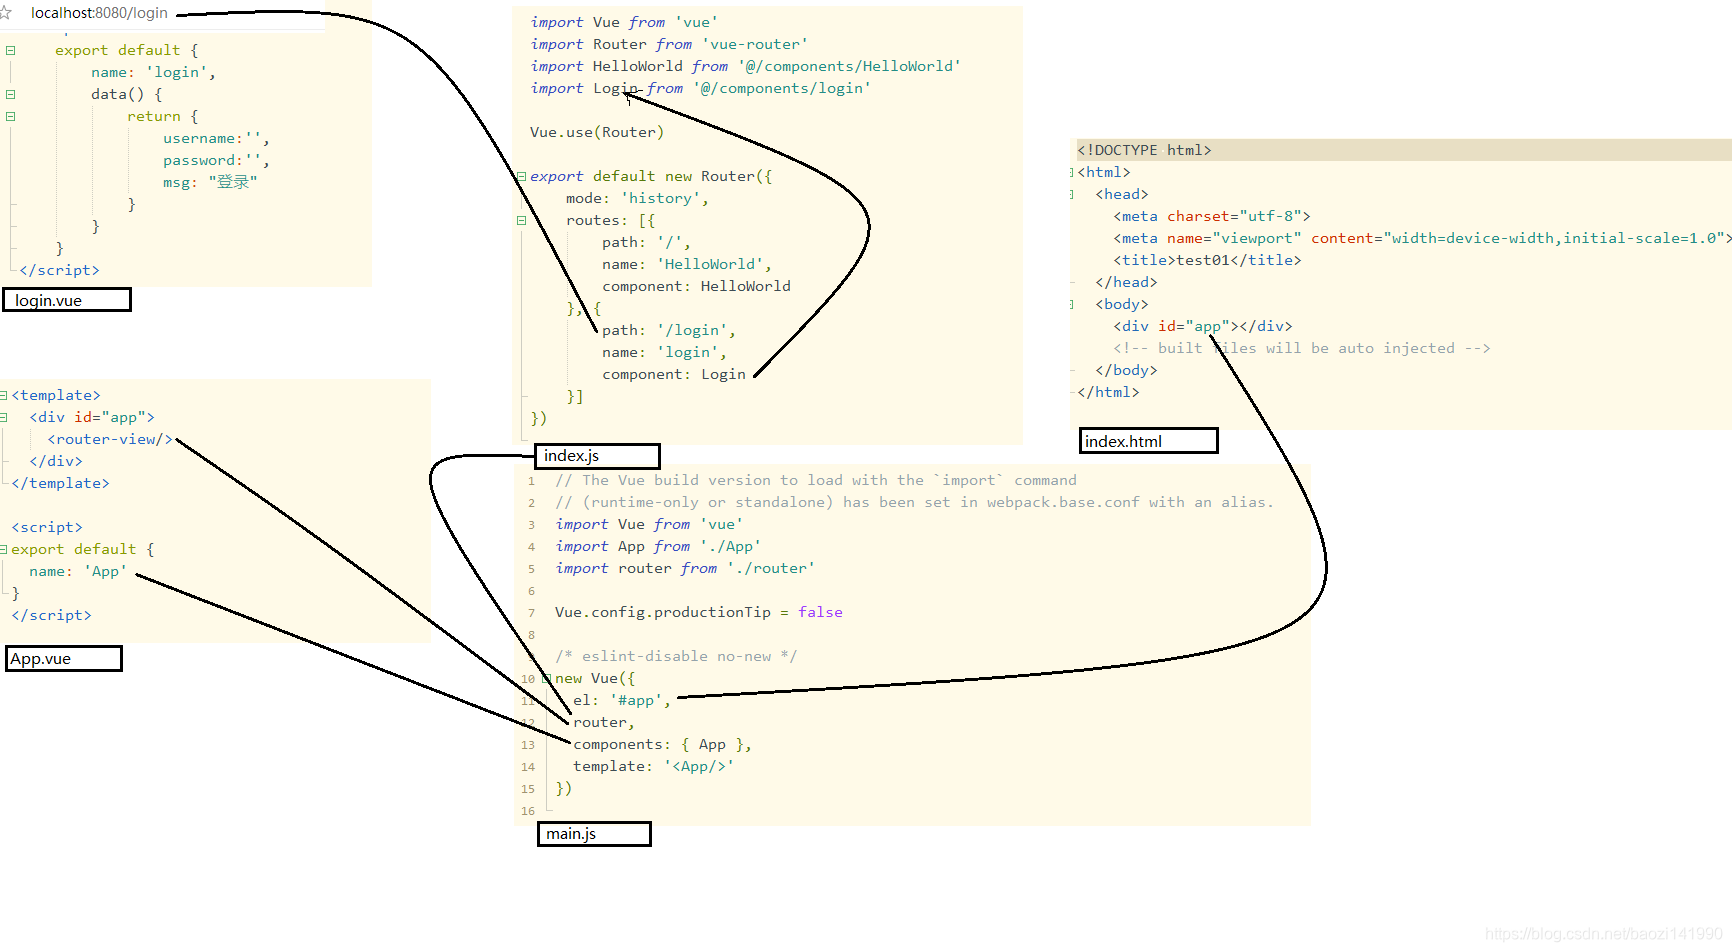
初步分析,页面之间的调用关系如图:
详解
路由的导航分为声明式导航和编程式导航
声明式
编程式
<router-link :to="...">router.push(...)
声明式路由<router-link>标签会被渲染成一个a标签,传递参数形式为:
1 <router-link :to="{path:'/login', query:{name:username}}" >
编程式路由
1 2 3 4 5 6 7 8 9 10 11 router.push('home' ) router.push({ path : 'home' }) router.push({ name : 'user' , params : { userId : '123' }}) router.push({ path : 'register' , query : { plan : 'private' }})
注意,path和params不能同时使用,否则params会失效。使用path会在URL上面显示传递的数据,要想不显示就是用name
数据获取
在路由到的界面使用watch组件来监听路由是否有变化。
1
2
3
4
5
6
7
8
9
watch: { '$route' : 'fetchData' }, methods:{ fetchData(){ this .$route.params.userId; } }
心细的人会发现,前面跳转页面为$router,接收数据为$route,这里要注意是不一样的。
相关属性
replace
跟 router.push 很像,唯一的不同就是,它不会向 history 添加新记录,而是跟它的方法名一样 —— 替换掉当前的 history 记录。<router-link :to="..." replace> | router.push(...) |
append
设置 append 属性后,则在当前 (相对) 路径前添加基路径。例如,我们从 /a 导航到一个相对路径 b,如果没有配置 append,则路径为 /b,如果配了,则为 /a/b
1 <router-link :to="{ path: '/b'}" append></router-link>
例:
当前路径:localhost:8080/a
使用append路由到/b后路径:localhost:8080/a/b
不使用:localhost:8080/b
tag
有时候想要 渲染成某种标签,例如。 于是我们使用 tag prop 类指定何种标签,同样它还是会监听点击,触发导航。
1 2 3 <router-link to ="/foo" tag ="li" > foo</router-link > <li > foo</li >
VueAjax 官网只介绍了如何引入axios,这里是设置全局引入
npm下载axios: 1 npm install axios --save
全局引入axios 在main.js中加入如下代码:
1
2
import axios from 'axios' Vue.prototype.$ajax= axios
例子 添加之后就能在vue文件methods中使用$ajax,例:
执行 GET 请求
1 2 3 4 5 6 7 8 9 10 11 12 13 14 15 16 17 18 19 20 axios.get('/user?ID=12345' ) .then(function (response ) console .log(response); }) .catch(function (error ) console .log(error); }); axios.get('/user' , { params: { ID: 12345 } }) .then(function (response ) console .log(response); }) .catch(function (error ) console .log(error); });
执行POST请求
1
2
3
4
5
6
7
8
9
10
axios.post('/user', { firstName: 'Fred', lastName: 'Flintstone' }) .then(function (response) { console.log(response); }) .catch(function (error) { console.log(error); });
axios API 可以通过向 axios 传递相关配置来创建请求
1 2 3 4 5 6 7 8 9 10 11 12 axios({ method: 'post' , url: '/user/12345' , data: { firstName: 'Fred' , lastName: 'Flintstone' } }); axios('/user/12345' );
axios跨域问题 在config/index.js文件中找到proxyTable{},在括号中添加:
1
2
3
4
5
6
7
8
9
10
'/api' : { target: 'http://localhost:8080/' , changeOrigin: true , pathRewrite: { '^/api' : '/' } }
但是这样处理有个问题啊,只能在开发环境使用。真正线上时还是需要封装一下
封装axios 在一些大型项目中会封装axios,并且添加拦截器。在src下创建目录utils,在utils下创建js文件fetch.js。内容如下:
1
2
3
4
5
6
7
8
9
10
11
12
13
14
15
16
17
18
19
20
21
22
23
24
25
26
27
28
29
30
31
32
33
34
35
36
37
38
39
40
41
42
43
44
45
46
47
48
49
50
51
52
53
54
55
56
57
58
59
60
61
62
63
64
65
66
67
68
69
70
71
72
73
74
75
76
77
78
79
80
81
82
83
84
85
86
87
88
89
90
91
92
93
94
95
96
97
98
99
100
101
102
103
104
105
106
107
108
109
110
111
112
113
114
115
116
117
118
119
120
121
122
123
124
125
126
127
128
129
130
131
132
133
134
135
136
137
138
139
140
141
142
143
144
145
146
147
148
149
150
151
152
153
154
155
156
157
158
159
import axios from 'axios' Date .prototype.Format = function (fmt ) let o = { "M+" : this .getMonth() + 1 , "d+" : this .getDate(), "h+" : this .getHours(), "m+" : this .getMinutes(), "s+" : this .getSeconds(), "q+" : Math .floor((this .getMonth() + 3 ) / 3 ), "S" : this .getMilliseconds() } if (/(y+)/ .test(fmt)) fmt = fmt.replace(RegExp .$1 , (this .getFullYear() + "" ).substr(4 - RegExp .$1. length)) for (var k in o) if (new RegExp ("(" + k + ")" ).test(fmt)) fmt = fmt.replace(RegExp .$1 , (RegExp .$1. length == 1 ) ? (o[k]) : (("00" + o[k]).substr(("" + o[k]).length))) return fmt } axios.interceptors.response.use(response => return response.data }, error => { return error.data }) axios.defaults.withCredentials = false function checkStatus (response ) if (response && (response.status === 200 || response.status === 304 || response.status === 400 )) { return response } return { status: -404 , msg: '网络异常' } } function checkCode (res ) if (res.status === -404 ) { console .log(res.msg) } if (res.data && (!res.data.success)) { } return res } function timestampToTime (timestamp ) let date = new Date (timestamp), Y = date.getFullYear() + '-' , M = (date.getMonth() + 1 < 10 ? '0' + (date.getMonth() + 1 ) : date.getMonth() + 1 ) + '-' , D = date.getDate() + ' ' , h = date.getHours() + ':' , m = date.getMinutes() + ':' , s = date.getSeconds() return Y + M + D + h + m + s } export default { post(url, data) { return axios({ method: 'post' , url, data, timeout: 15000 , headers: { 'X-Requested-With' : 'XMLHttpRequest' , 'content-type' : 'application/json;charset=UTF-8' } }).then( (response) => { return response } ).then( (res) => { return res } ) }, upload(url, data) { let form = new FormData() Object .keys(data).forEach(value => form.append(value, data[value]) }) return axios({ method: 'post' , url, data, transformRequest: [function (data ) let ret = '' for (let it in data) { ret += encodeURIComponent (it) + '=' + encodeURIComponent (data[it]) + '&' } return ret }], timeout: 15000 , headers: { 'Content-Type' : 'application/x-www-form-urlencoded' } }).then( (response) => { return response } ).then( (res) => { return res } ) }, get (url, params) { return axios({ method: 'get' , url, params, timeout: 15000 }).then( (response) => { return response } ).then( (res) => { return res } ) }, put(url, data) { return axios({ method: 'put' , baseURL: process.env.BASE_API, url, data, timeout: 15000 }).then( (response) => { return response } ).then( (res) => { return res } ) }, time(tamp) { return timestampToTime(tamp) } }
然后再main.js中加入以下代码:
1
2
3
4
5
6
import fetch from './utils/fetch' const extend = Vue.prototypeextend.$post = fetch.post extend.$get = fetch.get extend.$form = fetch.form
然后再vue文件使用的时候就很方便了:
1
2
3
4
5
6
7
this .$post('http://localhost:8080/Mybatis_war_exploded/upload.do' ,imageFile) .then(function (response ) console .log(response); }) .catch(function (error ) console .log(error); });
结束 教程到这里就结束了,新手小白。写这个一边写一边自己做的,如果有错误的地方请留言多多指教。